


Soft and chewy homemade taro mochi made with taro powder and stuffed with homemade taro paste. Made completely from scratch, this Japanese inspired dessert tastes nutty, earthy and with a hint of vanilla!
As a self-proclaimed fan of all Japanese desserts, mochi is easily one of my absolute favourites. If you’ve made my Strawberry Cheesecake Mochi before, you know just how easy it is to make this deliciously cute dessert!
Taro is one of the most unique flavours out there, with its nutty and earthy hints. This homemade taro mochi recipe celebrates taro and maximises its flavour by using homemade taro paste.
The mochi shell had a chewy bite to it, whereas the filling is pillowy soft and sweet. Taro mochi is traditionally eaten in Japan during New Year’s celebrations, but nowadays this dessert is popular worldwide.
This recipe is oven free and only requires a microwave for the mochi dough and steamer for the taro paste.
Looking for more delicious taro recipes? Check out all time favorite Taro Milk Tea, this refreshing and sweet Taro Ice Cream or these extra fluffy Sweet Taro Buns.
Fun fact: In Japan, mochi symbolises good health and fortune.

What is taro mochi?
Mochi is a type of ‘wagashi’ or Japanese sweet made from glutinous rice flour. Known in Japan as ‘Daifuku’ (大福), this treat is a bite sized dessert filled with a sweet paste.
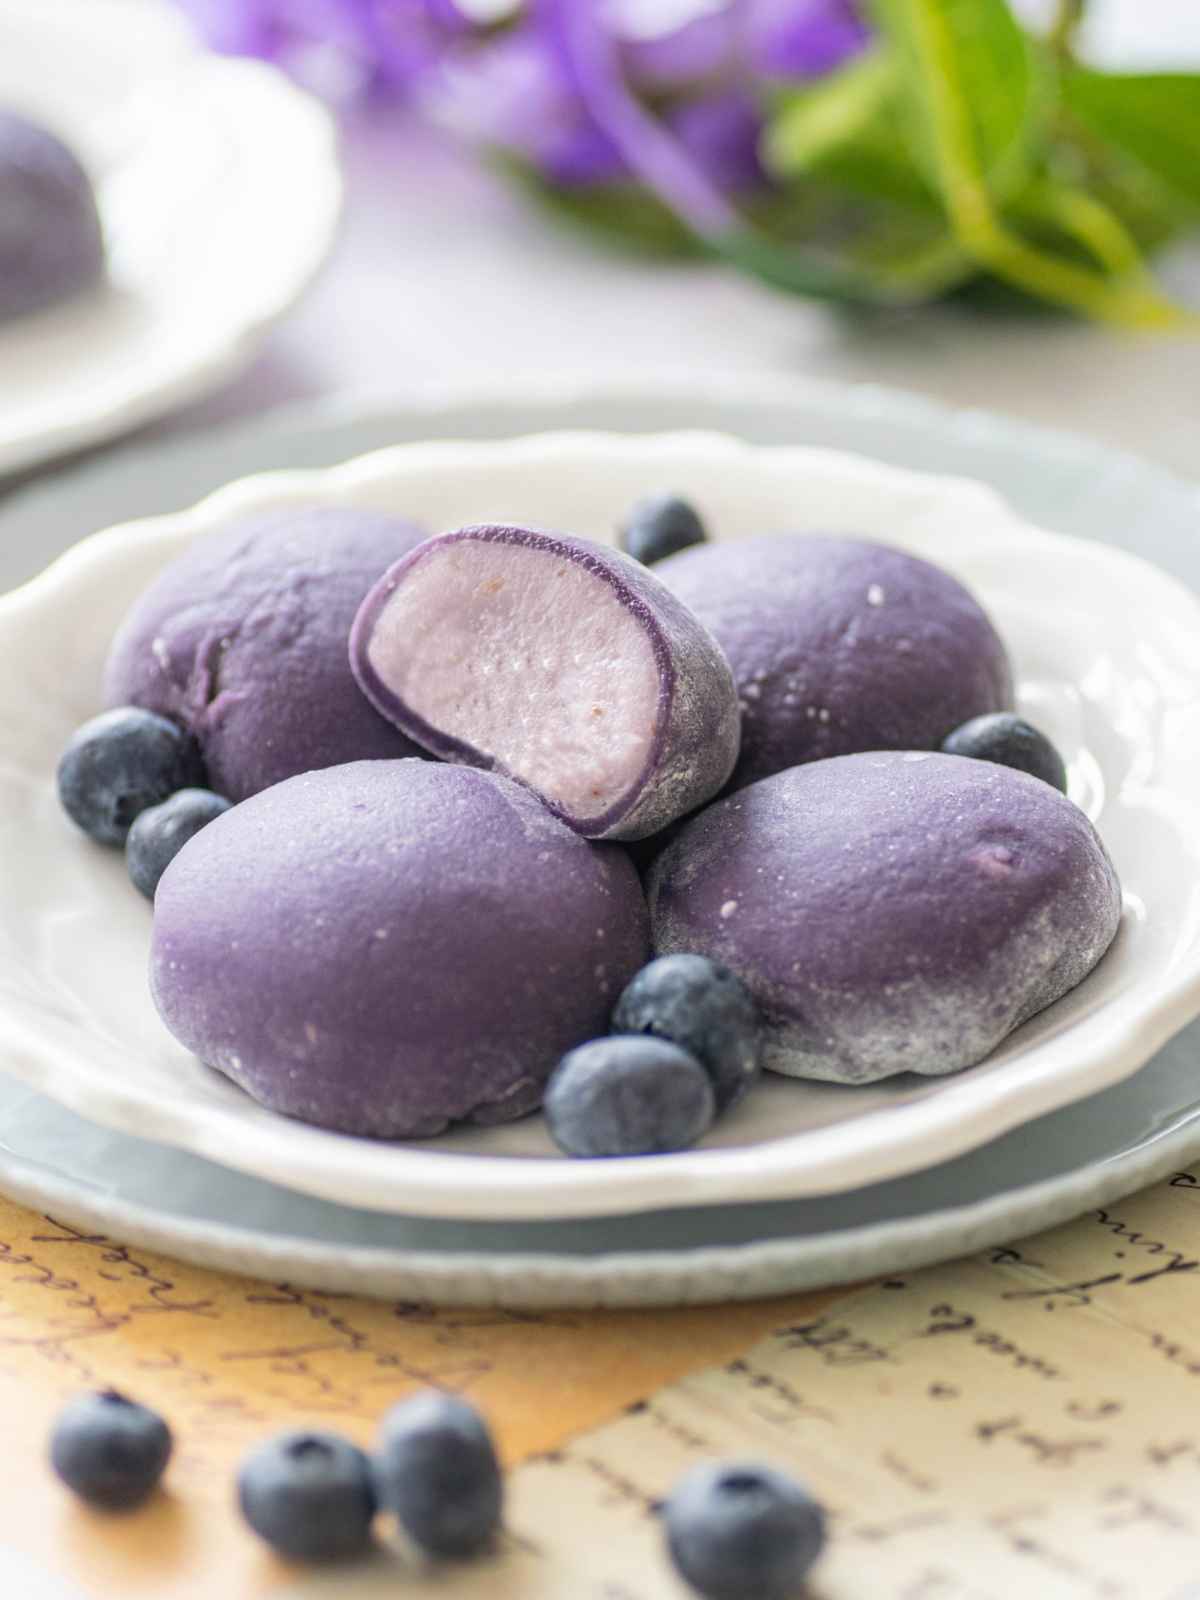
Taro mochi is a type of mochi that tastes like taro root and is typically purple in colour. This little dessert is usually about 2-inches in size and shaped into a cute little ball. Its shell is usually chewy and elastic, and its interior is stuffed with taro paste.
Taro mochi is very easy to make at home and only takes minutes to prepare.
What is taro paste?
Taro paste is a sweet paste used as a filling for various desserts. From taro steamed buns to taro mooncakes, this paste is a great alternative to red bean paste.
Taro paste can also be used as a base for other desserts or drinks, such as taro bubble tea or taro ice cream. You can also eat it on its own, as it’s sweet and has a slightly nutty flavour. I recommend enjoying it topped with some nuts, it’s delicious!
This smooth paste is a great filling for mochi, as it’s soft, flavourful, and sweet. It’s also especially easy to use for taro mochi because it can be easily shaped into a ball.
You can find everything about it in my post about taro paste, including uses, detailed method and recipe.

What does taro mochi taste like?
Taro mochi has a very unique and delectable flavour. Stuffed with homemade taro paste, this taro wagashi has an earthy, nutty flavour with hints of sweet vanilla. Since the dessert is made with homemade taro paste, you can adjust the level of sweetness.
The exterior of taro mochi is like a chewy, stretchy, and gummy marshmallow. This recipe adds taro powder in the mochi dough, making the chewy shell taste earthy and sweet.
Once you bite into this mochi, you will feel a combination of flavours and textures, making this dessert so unique and quirky. Taro, despite being a root vegetable, has a surprising sweet and nutty flavour. This pairs really well with the chewy shell and makes this dessert really fun to eat.
Ingredient round-up
Although this recipe is very easy to make, you will require some slightly specialist ingredients. They can be easily found and will open your palate to a whole new world of flavours!
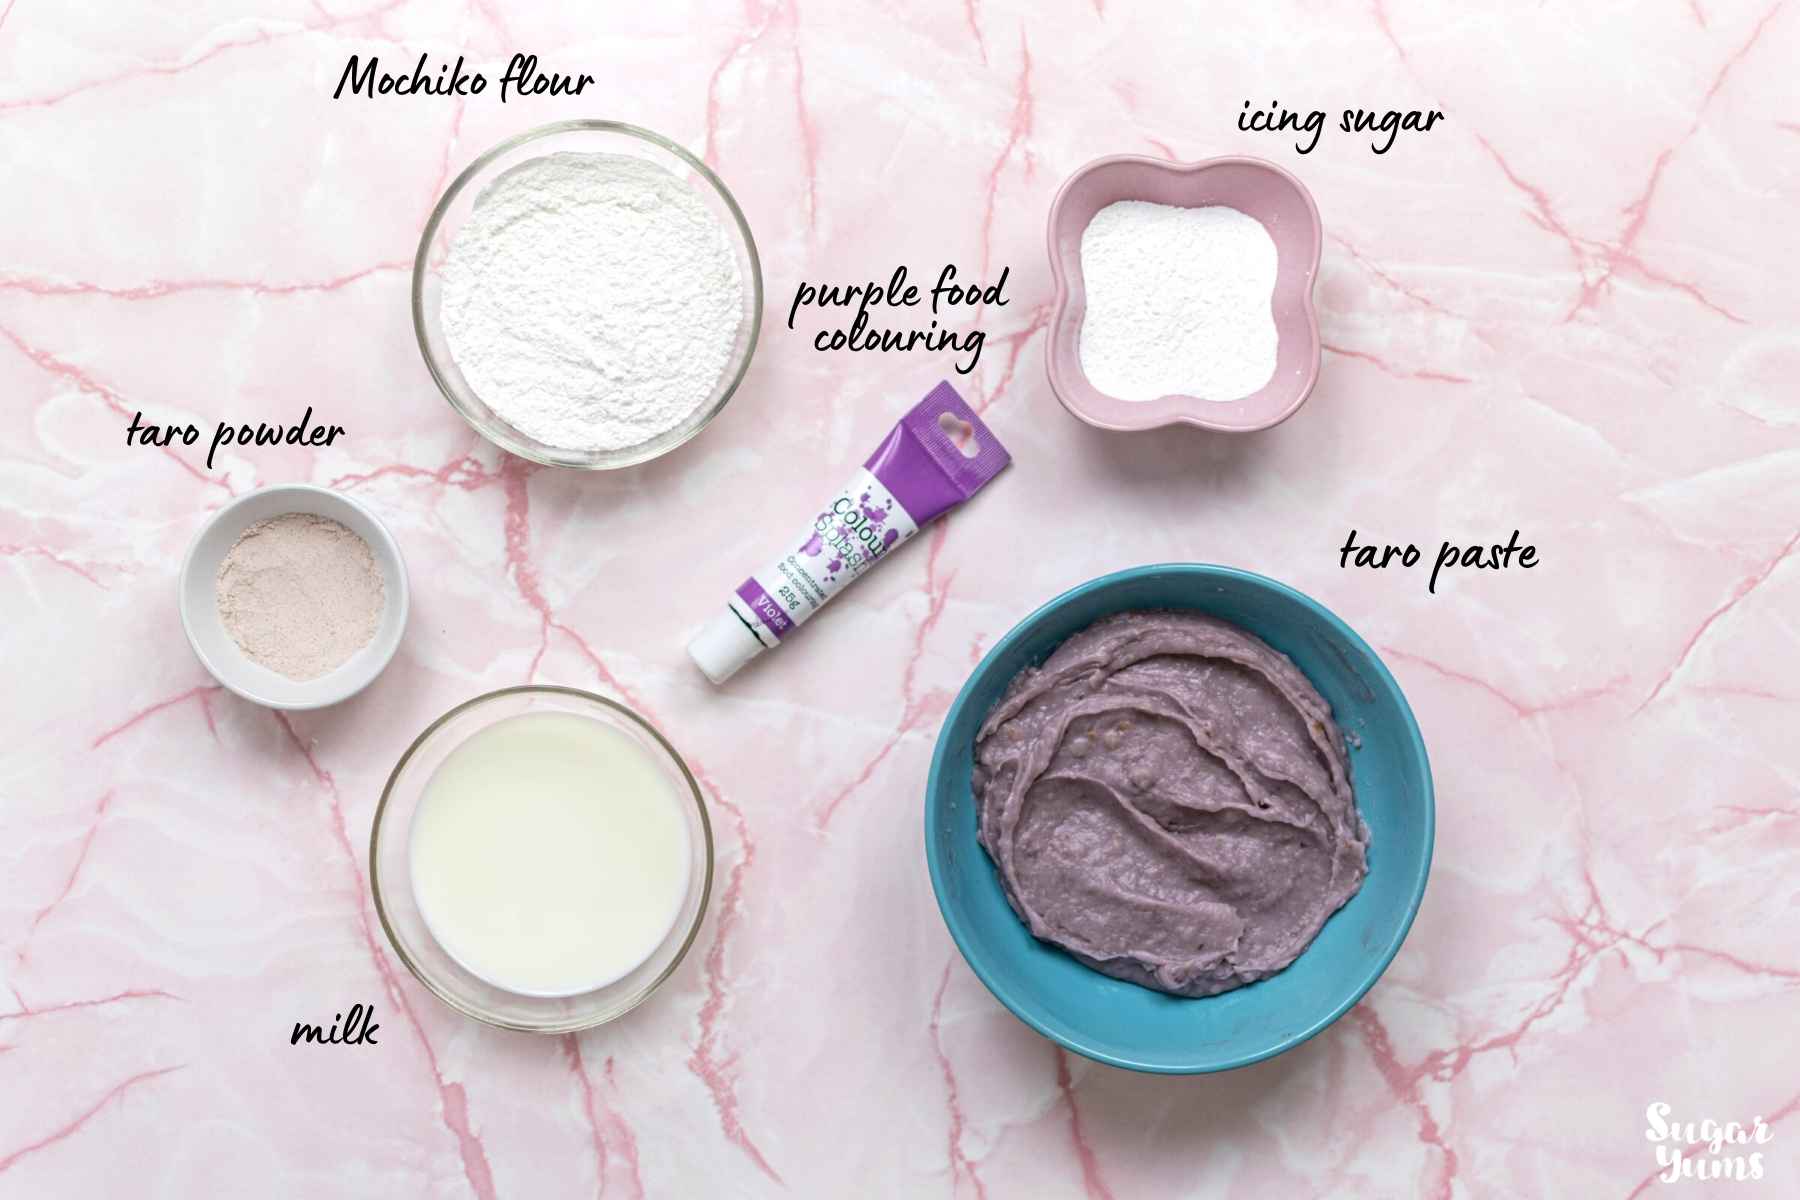
Mochiko flour – also known as glutinous rice flour. Although glutinous rice flour can be found in most Asian supermarkets, I recommend getting the Japanese version known as mochiko flour. This type of flour is made specifically for mochi and is very fine, resulting in a very smooth dough. I use this Mochiko flour brand.
Taro powder – also known as taro bubble tea powder. This is the powder typically used by shops to make taro milk bubble tea. If you have pure taro powder, that can also work really well. However, the easiest one to source is bubble tea taro powder.
Milk – the wet ingredient in the dough. I like to use milk because it gives a creamier flavour. For vegan alternatives this can be replaced with plant-based milk or even water.
Icing sugar – adds sweetness to the mochi dough. I strongly recommend using icing sugar instead of granulated sugar, as it yields a smoother texture. If you only have granulated sugar, dissolve it in the milk before adding to the dough mixture.
Taro paste – made from taro root, coconut milk and sugar. You can make it by following my taro paste recipe. Since we are making taro mochi, I do not recommend substituting taro paste with anything else.
How to make taro mochi
Taro mochi is made from two parts: the mochi dough and the taro paste. Both elements require minimal effort and take only minutes to prepare.
I recommend preparing the taro paste the day before, so it has time to mature its flavours but also to firm up slightly. Follow my detailed recipe on how to make taro paste for the full ingredients and method.

Making mochi dough is really easy and only requires one bowl and a microwave.
- Combine all the ingredients into a bowl and mix into a smooth paste.
- Cover the bowl with plastic wrap and microwave in 2 or 3 intervals until fully cooked. Fold the sticky dough in on itself until it becomes more coherent.
Pro tip: mochi dough is incredibly sticky, so it needs a lot of dusting with corn starch to be handled.

Once the dough is ready, let it cool down for a few minutes. Dust a silicone mat with plenty of corn starch, then sprinkle more over the mochi dough. Divide the dough into 12 equally sized balls.
- Flatten the mochi dough ball into a disc.
- Place a dollop of taro paste in the middle.
- Seal the edges around the taro paste, pinching to make them stick.
- Roll in your palm a few times to make it round.
And we’re done. Now you need to repeat this process for all the other mochi balls, taking your time with each one of them.
Once done, let the homemade taro mochi chill in the fridge for at least 30 minutes before eating. This will make the dough a little firmer and easier to consume.
Note: chew mochi properly before swallowing due to its sticky texture.

Storing mochi
For the best flavour and texture, I recommend eating taro mochi on the day you’ve made it. However, taro mochi can also be stored to be enjoyed later.
Refrigerate – for up to 2 days. Place in an airtight container before chilling. Keep in mind that refrigerating mochi can make it slightly tougher and less chewy than when fresh.
Freezing – the best option for longer term storing. Homemade taro mochi will last in the freezer for up to 3 weeks if stored in an airtight container. Thaw at room temperature for an hour before consuming.
Frequently asked questions
Yes, taro mochi can be made vegan. This recipe uses milk for the mochi dough, but this can be replaced with plant-based milk or water. The taro paste used is fully vegan.
This recipe is entirely gluten fee, as glutinous rice flour contains no gluten. Taro paste is also gluten free.
All purpose flour cannot be used to make mochi. Taro mochi can only be made with mochiko or glutinous rice flour.
Mochi has a very short shelf life, as it can easily go mouldy. Please ensure you store it in adequate conditions – see post above for more information.
Technically you can, but it will not be taro mochi anymore. The treat will still be mochi and just as delicious.

If you enjoyed this recipe, you will love these too:


If you’ve tried this recipe out, please don’t forget to rate and comment on this post. I love hearing from you, so feel free to reach out to me on social media as well and tag me in your posts!
Recipe

Taro Mochi Recipe
Ingredients
- 100 grams mochiko flour *
- 10 grams taro bubble tea powder
- 120 grams milk, warm *
- 30 grams icing sugar
- ½ batch taro paste *
Extra
- 25 grams cornstarch, for dusting (¼ cup)
Instructions
- Prepare the filling the day before by following my recipe for homemade taro paste.
- To make the mochi dough, combine the flour, taro powder, and icing sugar in a glass bowl. Slowly pour in the warm milk, mixing well to combine into a smooth paste.
- Cover the bowl with plastic wrap and poke a few holes in the film. Microwave for 2 minutes. Give the mixture a good mix to loosen it up.
- Cook for a further 2 minutes in the microwave. Use a wooden spoon or spatula to fold the dough in on itself a few times. Keep folding until the dough becomes sticky and stretchy.
- Sprinkle some corn starch on the work surface, then tip the dough over. Sprinkle more corn starch over the mochi dough, then knead it a few times until the dough becomes firmer. Divide the dough into 12 equal parts.
- Slightly flatten the mochi dough ball by using a small rolling pin. Place 1 teaspoon of taro paste ball in the middle. Do not overfill.
- Wrap the mochi dough around the taro filling, sealing it by pinching the mochi dough.
- Roll between palms to make the taro mochi more round. Repeat the process for the remaining mochi dough balls. Chill for at least 1 hour before serving.
Notes
- I recommend using a kitchen scale in grams for more accuracy. The cups used for the conversion are standard US customary cups (1 cup flour = 136g). There are many different types of cups across the globe, which is why I strongly recommend using grams instead.
- Nutritional value is estimative and is calculated per serving (this recipe makes 12 servings).
- Mochiko flour is also known as glutinous rice flour. All purpose flour cannot be used instead.
- For vegan taro mochi, replace the milk with plant-based milk or water.
- You only need to make half of my recipe for taro paste (use only half of the ingredients).
Nutrition
Pin this recipe for later!

Max says
I'm a big fan of Mochi sweets and I tried taro flavor Mochi once in Japan. Since then I've been trying to find recipe that tastes like that and this one is pretty darn close!! Really clear instructions too so thanks a lot for bringing back so many good memories 🙂
Hanelore Dumitrache says
Hi Max, I'm so glad you've enjoyed this recipe! This is probably one of the best compliments I've ever received on a recipe haha thank you!
Sally says
LOVE LOVE LOVE!!!! I would eat mochi everyday if I could, but unfortunately I live outside the city and can only have them a couple of times month... But not anymore! I'm so happy to have finally found such a detailed recipe that even a beginner such as myself can follow!! 🥳
Justine says
I tried your strawberry Mochi before and they were delicious. These ones were even easier to make, so big win in my books. Loved the coconut flavour too!
Hanelore Dumitrache says
Hi Justine, so happy to hear you enjoyed this recipe!
Luisa says
Easy to follow recipe and came out really tasty
Christina says
I made this vegan and it was sooo tasty! Love that you use coconut milk in the paste, makes it taste delicious!
Hanelore Dumitrache says
Hi Christina, so glad you enjoyed the recipe! I love making this taro mochi for my vegan friends too!
Kora Phan says
I made 2 dozens of the taro mochi and we went by the whole thing in one sitting. It was so light and chewy and the taro paste was sooo creamy!! We have a mochi shop in our town but their taro mochi doesn't taste as good as this one. THANK YOU!!!
Jaclyn Nguyen says
Getting all the ingredients were quite a challenge but at the end of the day when you’re biting into that mochi, it’s like a reward 😆 Thank you for such a recipe!
Hanelore Dumitrache says
My pleasure, so glad you enjoyed the recipe!
Kat says
What do I do without a microwave? Thank you!
Hanelore Dumitrache says
Hi Kat, you can cook the mochi dough on the stove instead! Place it in a heatproof bowl over simmering water (double boiler method). Stir (or fold) constantly for 8-10 minutes until the dough becomes smooth and sticky. Hope this helps and good luck! 😀
Hiroshi says
Hello.
Do you think I could use ube powder instead as taro powder is hard for me to find?
Thank you,
Hiroshi
Hanelore says
Hi Hiroshi, yes you can definitely use ube powder. Ube powder tends to absorb more liquid, so you might need to add a little more milk when you prepare the mochi dough. Let me know how it turns out and happy baking!
Han x