


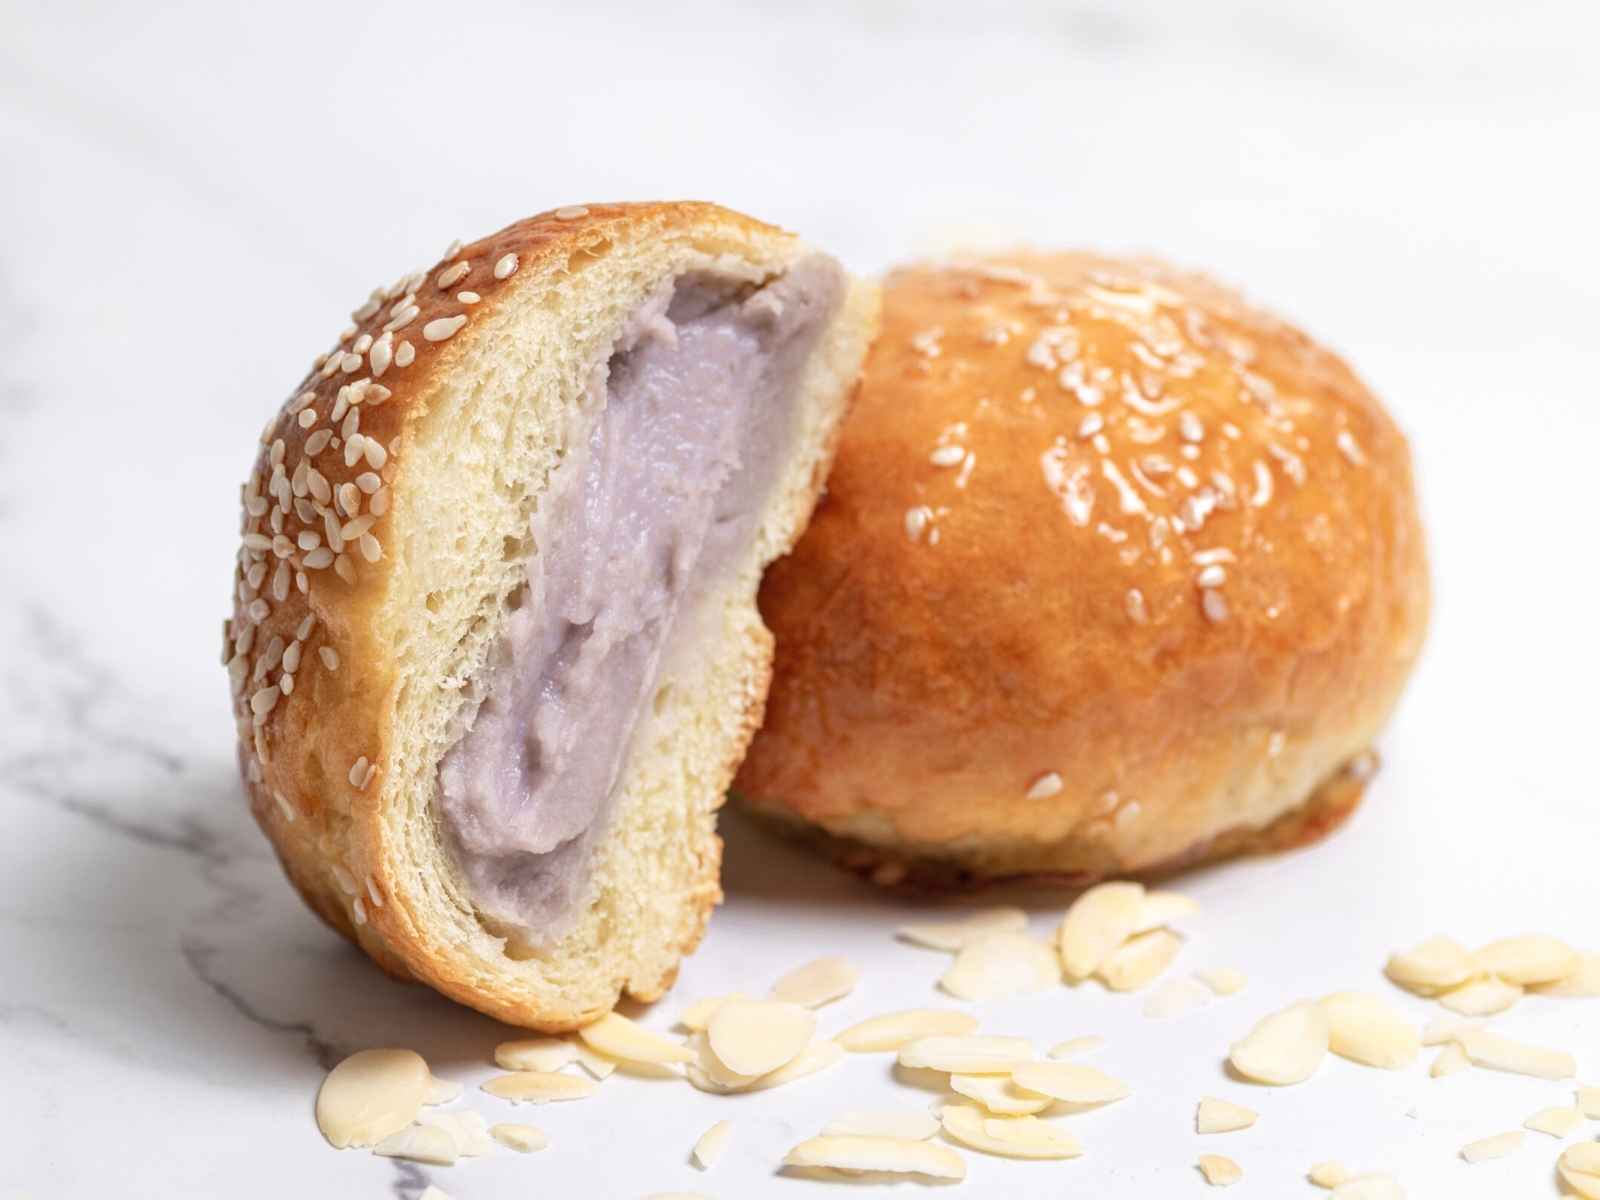
Incredibly light sweet taro buns with a creamy taro filling. Made with real taro root, these soft milk buns are extremely fragrant and have just the right amount of sweetness.

This year I have discovered taro root and completely fell in love with it. Taro has a subtle earthly sweet flavour that tastes a little like vanilla. From my loved and trusted Taro Paste to the fun and playful Taro Mochi, I just can’t get enough of taro desserts!
These fluffy taro buns are made using an Asian technique known as Tangzhong. This method involves making a paste or roux from flour and milk. Using this paste as the base for the milk buns makes them incredibly soft, but also longer lasting.
Looking for more amazing taro recipes? Check out the ultra popular Taro Milk Tea or the most refreshing Taro Ice Cream.

Why I love sweet taro buns
- The softest buns ever: Using the Tangzhong method, these taro milk buns are incredibly soft, fluffy, and light. They literally melt in your mouth!
- Fragrant and delicious: The milk buns are made from sweet dough. The taro paste filling is sweet and earthy, with hints of vanilla and coconut.
- Not overly sweet: there is little sugar used in these buns, which means less calories. The level of sweetness is not overpowering, making these taro buns ideal for most diets. However, if you like sweeter desserts, you can add more sugar or honey.
- Perfect for breakfast: These sweet taro buns are ideal for breakfast or a snack on the go.
- They stay fresh for up to 5 days: Due to using Tangzhong method, these buns remain soft and fluffy much longer than regular homemade bread. You can also freeze these buns for up to 3 months.

What is Tangzhong?
Tangzhong is essentially a roux made from flour and a liquid, either water or milk. The mixture is cooked on the stove until a thick and sticky paste is obtained. This paste is then added to bread dough to improve the texture and make it extra soft and fluffy.
This Asian technique of dough making yields some of the softest breads, that taste delicious and last a long time. I’m a massive fan of Tangzhong because:
- It makes the softest bread ever, extremely light and fluffy.
- Prolongs shelf life as the bread remains tender and soft for much longer.
- Requires less egg and butter in the dough, making the bread lower in calorie and less eggy in flavour.
- It’s ideal for buns and rolls, as the dough is very stretchy and cohesive, despite being extra soft when baked.
Equipment & Products
You can make this recipe in two ways: by hand or by using a stand mixer. Kneading the dough by hand can be quite tricky and not for everyone, which is why I recommend using a mixer. Here are my favourite tools for this recipe:
- Stand Mixer – I’m a big fan of the KitchenAid Artisan Stand Mixer, which is great for kneading dough.
- Food Steamer – really useful when steaming taro root. I recommend this electric food steamer, as it has a good capacity. You can also opt for a traditional bamboo steamer.
- Kitchen scale – I’m a big advocate of baking with a kitchen scale. This way there can be no mistakes on cup sizes. I have been using this brand of kitchen scales for years.
- Saucepan – needed for making the tangzhong roux.
- Whisk – great for whisking the tangzhong roux and preventing lumps. I love this whisk set as it gives you different sizes to work with.
- Rolling pin – needed to roll out the buns. I always recommend using a wooden rolling pin, as it keeps doughs from sticking to it.
Ingredient round-up
All ingredients used to make the bun dough are very common and can be found in most households. The slightly more special ingredients are used for the taro filling. Let’s look at both:

Bun dough
Flour – plain all-purpose flour is needed for this recipe. You can also use cake flour, although you may need to adjust the liquid quantity. Self-rising flour cannot be used for this recipe.
Milk – I recommend using whole milk, as it gives a richer flavour. You can also use plant-based milk or water.
Eggs – make the dough extra tender. I recommend using large eggs, either free-range or organic.
Instant dry yeast – the rising agent in the buns. I like to use instant yeast as it doesn’t need activating. You can also use fresh yeast – in grams, simply multiply the quantity by 3 (e.g., 10 grams of dry yeast = 30 grams of fresh yeast).
Butter – makes the dough extra soft and smooth. Ensure it is in pliable form, so leave it at room temperature for at least 2-3 hours prior to use. Alternatively, microwave for 10-15 seconds until soft (not melted).
Sugar – plain granulated sugar is used in this recipe. You can also use brown sugar if desired. Feel free to add more sugar if you want the buns to be extra sweet.
Taro paste
Taro root – raw, peeled and cubed.
Coconut cream – can also be replaced with coconut milk.
Sugar – adjust for desired level of sweetness.
For more details on the ingredients used for the taro filling, see my post on How to Make Taro Paste.
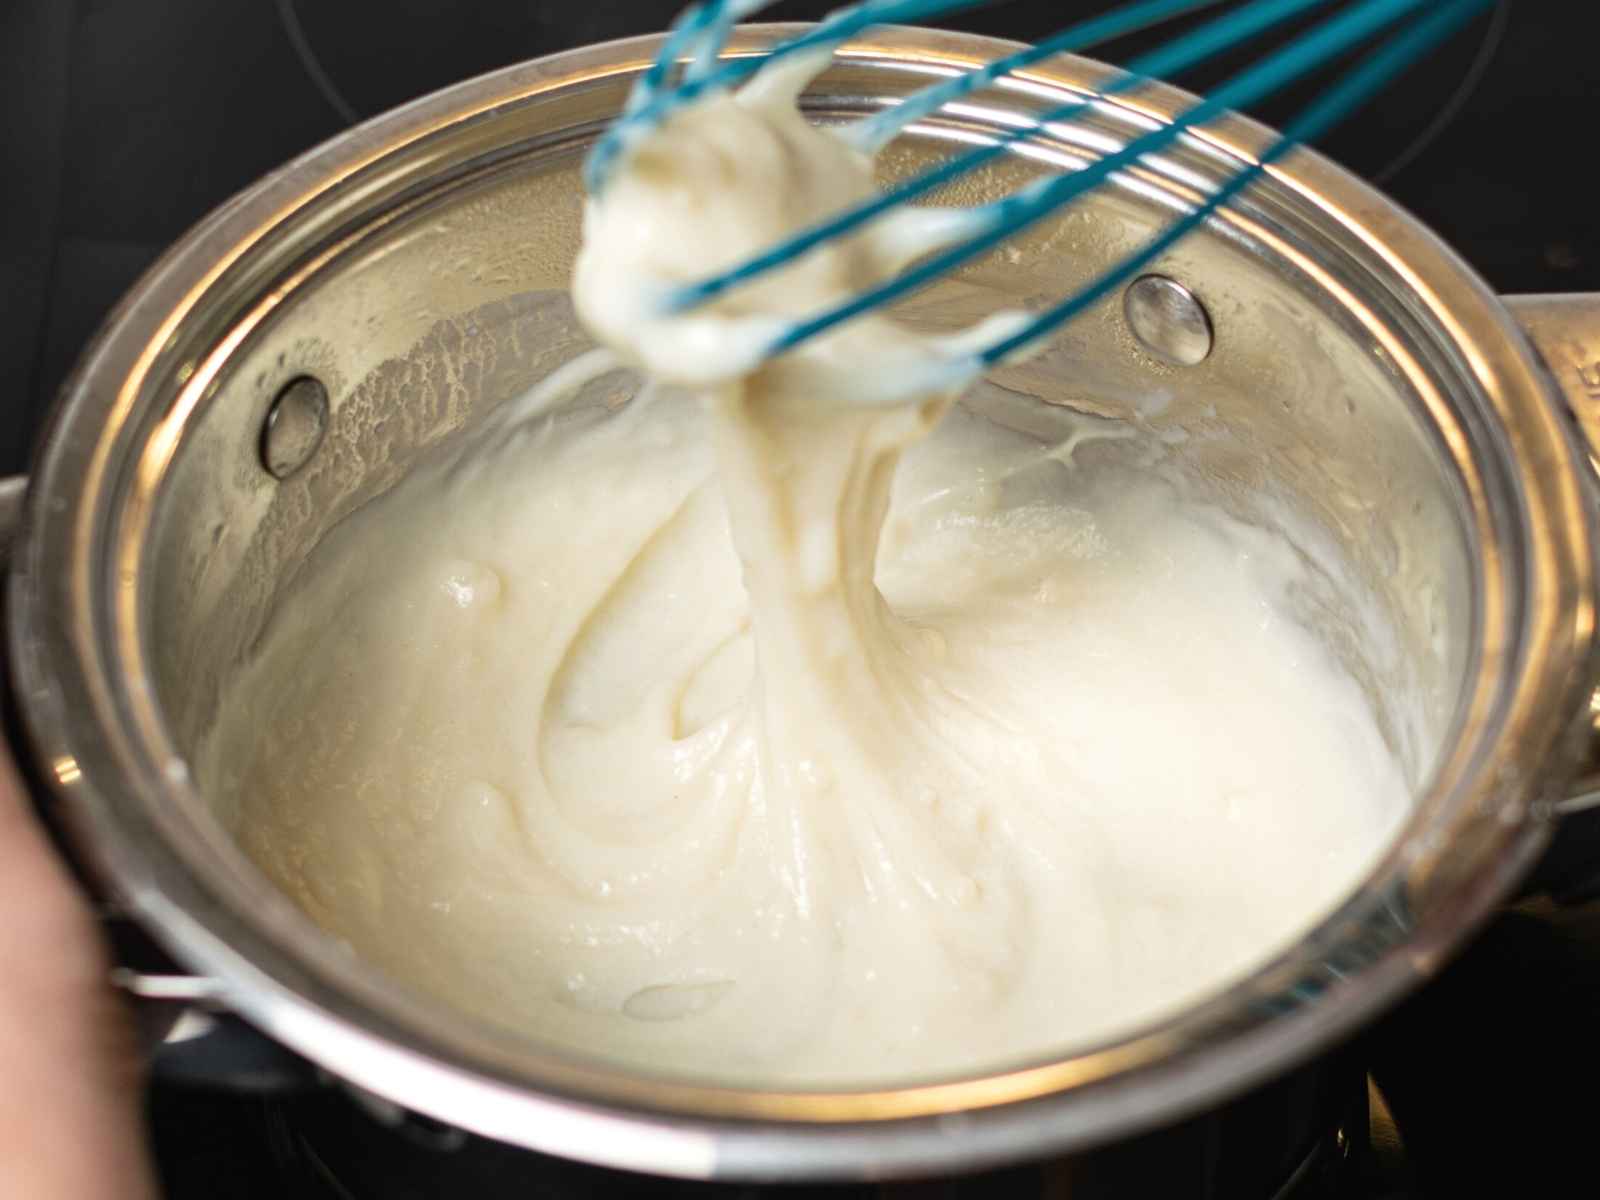
How to make Tangzhong
Making Tangzhong is very easy, and you only need a saucepan and a whisk. Let’s begin:

- Combine the flour and warm milk (or water) in a small saucepan. Whisk well to incorporate and ensure there are no lumps.
- Cook the mixture over low-medium heat, while whisking continuously. Once a sticky paste forms, remove from the heat and let cool down to room temperature.
How to make Taro Buns
Sweet taro buns are so easy and fun to make! I recommend making the taro paste in advance the day before. This way the paste has time to mature in flavour and thicken up, making it perfect for filling. Read my post about more about how to make the perfect Taro Paste.
For ease, I have broken down the process into 4 steps: making the dough, kneading the dough, forming the buns, and finally filling them.
Making the milk bun dough
There are two ways of making the dough: using a stand mixer or by hand. The process is pretty much the same, except for kneading the dough. Using a stand mixer is much easier and faster, but for demonstration purposes we will be looking at the handmade dough.

- Combine the yeast and warm milk. Set aside for 5 minutes until it doubles in size.
- Add all the ingredients (except butter) and Tangzhong paste into a large bowl.
- Combine everything into a lumpy dough with a spatula.
- Use your hands to bring the dough together. Although it will be sticky, do not add more flour.
Kneading the dough
If you’re using a stand mixer, use the dough hook to knead the dough for 10 minutes. Add in the softened butter, then knead for another 5 minutes.
By hand, be prepared to put in some elbow grease and knead for a good 20-25 minutes. It’s great exercise, trust me!

- Tip the dough over on the work surface. Start kneading by pulling the dough towards you, then rolling or pushing it back.
- The dough will be extremely stick, but do not add more flour. Keep pulling and rolling the dough. You can also smack it against the table for more fun.
- Once the dough looks less sticky, add in the softened butter. Knead it into the dough by stretching and folding over the dough until fully incorporated.
- The final dough will be firm and spring back when you push it with your finger. Proof in a warm place for at least 1-2 hours or until doubled in volume.
Shaping the buns

- Roll the do proofed dough into a log about 15 inches (40 cm) long.
- Divide the dough into 12 equal pieces. You can use a kitchen scale for more accuracy. Each piece will be about 65 grams or 2.3 oz.
- Roll each piece into balls by cupping your hand around and pressing down on the dough in a rolling motion.
- Use a rolling pin to roll out each dough ball into a disc about 6 inches (15 cm) in diameter. Try to make the sides thinner than the middle.
Filling the buns

- Scoop on spoonful of taro paste in the middle of the rolled-out bun. Do not overfill as this can make the filling leak out when baking.
- Take two opposite ends of dough and meet them in the middle. Press to make them stick together.
- Take the other opposite ends and stick them together. Press all the ends together and pinch them to make them stick.
- Turn the with the seam downwards. Cup your hands around the bun, then gently press while making a sweeping motion. This will make the buns perfectly round.
Pro tip: ensure the taro paste is not cold when adding it to the buns. Cold paste can slow down the proofing process. Leave the paste out for 1-2 hours before using it.
Baking taro buns

After forming all 10-12 taro buns, cover them with plastic wrap and let proof in a warm place for 30-45 minutes.
- Make a quick wash and coat the buns using a pastry brush.
- Optional but recommended – sprinkle a few sesame seeds or almond flakes on top.
- Bake the taro buns for 10-12 minutes or until golden brown, then let them cool down before consuming.
Success Tips & Tricks
- Be patient – Tangzhong dough takes quite a long time to knead. Be patient and keep kneading until the dough is firm and springy.
- No extra flour – when kneading by hand you can become tempted to add more flour to make the dough less sticky. This can make the dough too dense and bready.
- Don’t rush – this type of dough needs adequate proofing to make really soft and fluffy buns. Do not rush the proofing process and take your time.
- Use a stand mixer – will make your life so much easier. Kneading by hand can take up to 25 minutes, which is not for everyone.
- Room temperature taro paste – for an even and speedy rise. Cold taro paste inside the buns can hinder the proofing process, making it much slower.
- Silky smooth filling – pass the taro paste through a sieve to remove any lumps and make a super smooth filling.
- Sweet and sticky – Once baked, brush the taro buns with honey for extra sweetness.
How to store
Sweet taro buns will taste best when eaten fresh, within a day or two. However, the best thing about Tangzhong buns is that they last for quite a long time. Store the taro milk buns in an airtight container in the refrigerator for 1 week. To reheat, microwave for 20-30 seconds.
For longer-term storage you can freeze taro buns for up to 3 months.

Frequently asked questions
Taro buns are typically milk buns that are filled with a sweet taro root paste. They can be baked or steamed.
Taro buns are made of a sweet milk dough and filled with taro paste. Typically, the milk buns are made with a Tangzhong roux, and the taro paste contains sugar and coconut milk.
Taro buns are very soft and fluffy and texture and melt in your mouth. They are sweet, earthy and with a hint of vanilla. The filling is made with real taro root paste, which can have hints of coconut.
One sweet taro bun with taro filling is around 260 Kcals. Note: nutritional value is estimative and for reference only.
If you enjoyed this recipe, you will love these too:


If you’ve tried this recipe out, please don’t forget to rate and comment on this post. I love hearing from you, so feel free to reach out to me on social media as well and tag me in your posts!
Recipe

Sweet Taro Buns (Baked)
Ingredients
Taro paste
- 10 oz. taro root, peeled and cubed (300 grams)
- ½ cup granulated sugar (100 grams)
- ¼ cup coconut cream (50 grams)
- 2 ½ teaspoons coconut oil (10 grams)
Tangzhong roux
- ⅓ cup all-purpose flour (40 grams)
- ¾ cup milk, lukewarm (200 grams)
Bun dough
- 3 cups all-purpose flour (375 grams)
- ½ cup granulated sugar (100 grams)
- ½ tablespoon instant dry yeast (8 grams)
- 1 whole egg, large
- 1 egg yolk, large
- ½ teaspoon salt (2 grams)
- 3 tablespoons milk, lukewarm (45 grams)
- 2 tablespoons butter, room temperature (25 grams)
Egg wash
- 1 whole egg, large
- 1 tablespoon milk (15 grams)
Instructions
Taro Paste
- See my post on How to Make Taro Paste for the detailed recipe.
- Steam the peeled and cubed taro root for 30 minutes or until soft.
- Mash the steamed taro to make a puree. Pour in the coconut milk, sugar and coconut oil. Mix everything into a paste.
Tangzhong roux
- Combine the flour and milk in a small saucepan, mixing with a whisk.
- Cook over medium heat while whisking continuously until it looks like a sticky paste. Let it cool down to room temperature before adding to the bun dough.
Bun dough
- In a large bowl combine the flour, sugar, yeast, whole egg, egg yolk, salt, and lukewarm milk. Add the tangzhong (flour base), then use a spatula to combine it into a rough dough.
- If using a stand mixer: knead the dough using the dough hook attachment for 10-15 minutes. Once firm, add in the softened butter and knead for another 5 minutes.
- If kneading by hand: Knead the dough by stretching it outwards, then pulling it back. After 5 minutes of kneading add in the butter. Keep kneading to incorporate the butter and develop the gluten in the dough. It should takeabout 20 minutes until the dough become smooth and firm, but still a little bit sticky. The dough should spring back if you press onto it.
- Lightly grease a large bowl with vegetable oil, then place the dough into it. Cover with plastic wrap and place in a warm place to proof for about 2 hours or until it doubles or triples in volume.
- Once proofed, divide the dough into 10 equal pieces (weighing around 65 grams or 2.3 oz. each). Shape each piece into a roll by making a cup with the palm and pressing down onto the dough while making a sweeping motion.
- Using a rolling pin, roll out one bun into a disc (about 5 inches or 12 cm in diameter). Try to get the edges thinner than the middle of the disc.
- Place one spoonful of taro paste in the middle of the disc. Grab two opposite edges of the disc and stick them together. Then grab the remaining edges and stick them together, until the taro paste is encased inside the bun. Pinch all the edges together to seal the bun properly.
- Turn the roll with the pinched edges downwards. Shape the bun by cupping both palms around the bun and making a rolling motion whilst applying a little pressure. Repeat the process to make the remaining taro buns.
- Place the buns on a large baking tray lined with parchment paper. Leave at least 5 inches distance between each bun. Cover thetray with plastic wrap, then let the buns proof for 30 minutes or until doubled in size.
- Pre-heat the oven to 350F (180C). Prepare the egg wash by mixing the egg and milk together. Apply it onto each bun with a pastry brush.
- Bake for 10-12 minutes or until golden brown in colour. Cool down completely before serving.
Notes
- I recommend using a kitchen scale in grams for more accuracy. The cups used for the conversion are standard US customary cups (1 cup flour = 136g). There are many different types of cups across the globe, which is why I strongly recommend using grams instead.
- Nutritional value is estimative and is calculated per serving (this recipe makes 12 servings).
- Storing information: Keep at room temperature in an airtight container for up to 2 days. Refrigerate for up to 1 week and freeze for up to 3 months. See post for detailed explanation.
Nutrition
Pin this recipe for later!

Chris says
I love taro root so much and I’m so excited to try this dessert! Can I also use ube spread for the filling?
Hanelore Dumitrache says
Hi Chris, definitely try them because they're delicious!! And yes you can also use ube spread or paste. If you're using store-bought spread just make sure it's thick enough, so you can easily stuff the buns with it. Let me know how it goes!
Alexandra says
Woahh I didn't know that you could use taro paste this way! I've only ever tried the mochi version 😯 I'm definitely making them for my next together with my friends 🤤
Sarah Anne says
I love Chinese pastries and always end up buying a lot whenever I visit chinatown. These buns tasted just like the ones I buy there and I love how soft they are. They're not sweet enough for my taste, so I added more sugar in the dough and they came out perfect!
Hanelore Dumitrache says
Hi Sarah Anne, I'm glad to hear you enjoyed the recipe! Sounds like a great idea, you can always adjust the sugar in both the dough or the taro paste.
Courtney says
These were amazing! If I wanted to put some rice flour in the dough, what percent would I use? I presume it would be normal rice flour and not glutinous?
Hanelore Dumitrache says
Hi Courtney, so happy you like this recipe! Yes you are correct, glutinous rice flour wouldn't work well in this recipe, as it can make the buns too chewy. If you want to use plain rice flour, I recommend using it in place of regular flour in the Tangzhong roux. You can also try using 1/2 cup of rice flour and 2 1/2 cups of regular flour for the dough. I would not recommend using more than 1/2 cup of rice flour in the dough itself, as rice flour contains no gluten - so it's much more difficult to get fluffy, soft buns without gluten. I hope this helps!
Juan Gallagher says
Hello any suggestions the buns burst while baking anyway to not get them to do that also this recipe is awesome!
Hanelore Dumitrache says
Hi Juan, so glad you enjoyed this recipe! The buns usually split if there's too much filling or they are baked at a much too high temperature. I would recommend testing out the buns with less filling and checking that your oven doesn't run too hot. Hope this helps and happy baking!
Cathy says
I must be blind, but I don’t see what temperature I should make the buns that. Could you please answer this question for me?
Hanelore Dumitrache says
Hi Cathy, no worries at all! The temperature is written in the recipe card at the bottom, it's 350F (180C). Bake for 10-12 minutes or until golden-brown in color. I hope this helps and happy baking!
Joy says
I consider myself an average baker and a connoisseur of Japanese and Taiwanese pastries and this recipe is phenomenal. I have now used it five times in the last year and a half and each batch has been delicious and thoroughly enjoyed (and repeatedly requested) by friends and family. For the taro paste, I add a tiny pinch of salt and dial the cooking time and coconut cream amount just a little different each time, but always follow the dough instructions to a tee and get fluffy milk bread every time. Thank you so much!
Hanelore Dumitrache says
Hi Joy, I'm so so happy to hear that! Thank you so much for your lovely comment, made my day! Happy baking!